
Hands on: An amateur photographer tests out Adobe's latest Lightroom
![]()
Digital cameras have changed the photography landscape, enabling amateurs to become what marketers call "prosumers." The latest gear and software tools are now being directed at this group, but is it worthwhile for you to upgrade? Mary Hartney spent a month with Adobe's Lightroom 2 to find out.
As a self-taught photographer who has shot with formats all over the map, it's only natural that I would have cobbled together a patchwork system for editing and processing my photos. A marketing expert would call me a consumer-level photographer, or a serious amateur, and both are correct. I began shooting in spring of 2006 with a 35mm Canon from the early 1980s, experimented with some toy cameras, and eventually invested in a Nikon D80 and three lenses.
My workflow typically involves Google's Picasa photo editing software and Photoshop (in several incarnations) for some of the trickier work. Adobe's Lightroom 2 combines what I love about Picasa -- importing, organization, a visual of all the photos on my hard drive, and easy one-touch auto-fix editing -- as well as many of the main tools that enable Photoshop to give images some pop, fine-tuning or special treatment.
Adobe touts Lightroom 2 as a shooting-to-publication program, and in most cases it is. It's set up with five different "modules," which are different screens with presets related to the function of the module. The five modules are: Library, Develop, Slideshow, Print and Web, and keyboard shortcuts or certain actions move your work between the five.
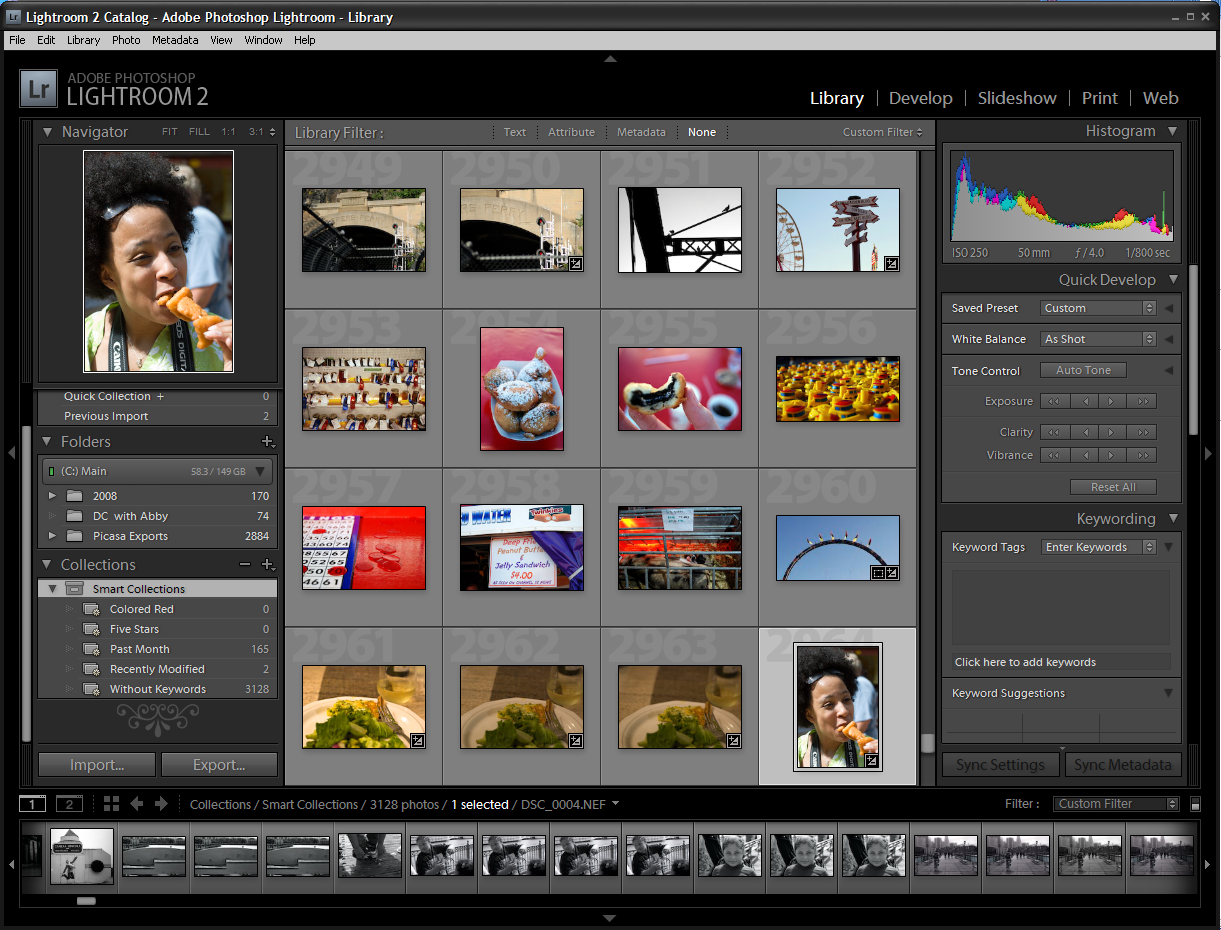
Lightroom 2's Library Module (click to enlarge)
A sample workflow in Lightroom 2 would be to import a batch of photos into the Library module, either directly from a digital camera or from the hard drive, edit and tweak the best of the bunch in the Develop module, and then export the images for publication via Slideshow, Web or Print. Each of the three final modules includes settings for work specifically related to each; for example, the Print module includes a selection box on margin sizes, and the Slideshow module has options for slide timing and fades.
This setup essentially reflected the work I did in Lightroom 2, and the software also offered me another major advantage: I could shoot in RAW. I switched to RAW early in the month that I tested Lightroom and was pleased with the results. The major benefits of shooting in RAW, which I'd never seen firsthand, are more wiggle room to touch up and edit photos and dealing with images that haven't already been compressed inside the camera, using proprietary algorithms and software.
Because you're dealing with what really is an unprocessed and "raw" file, there's more room to tweak. For film geeks, this means that RAW images are more akin to negative film in terms of post-processing room, whereas JPEGs are similar to positive, slide film.
But there are some downsides worth noting. RAW file sizes are much larger coming out of the camera, which can mean less storage while shooting and on your hard drive, as well as slowed-down processing times in Lightroom. I also noticed that because Adobe doesn't have access to the proprietary information behind Nikon's RAW format, my photos went through a brief automatic edit when I'd import them into Lightroom. This was a bit disheartening, especially because they often lost a little bit of their vividness and became flatter to the eye. I could, however, add that back with the one-click "Punch" setting in the Develop module. Still, an extra step is an extra step -- and lost information can never be entirely recovered.
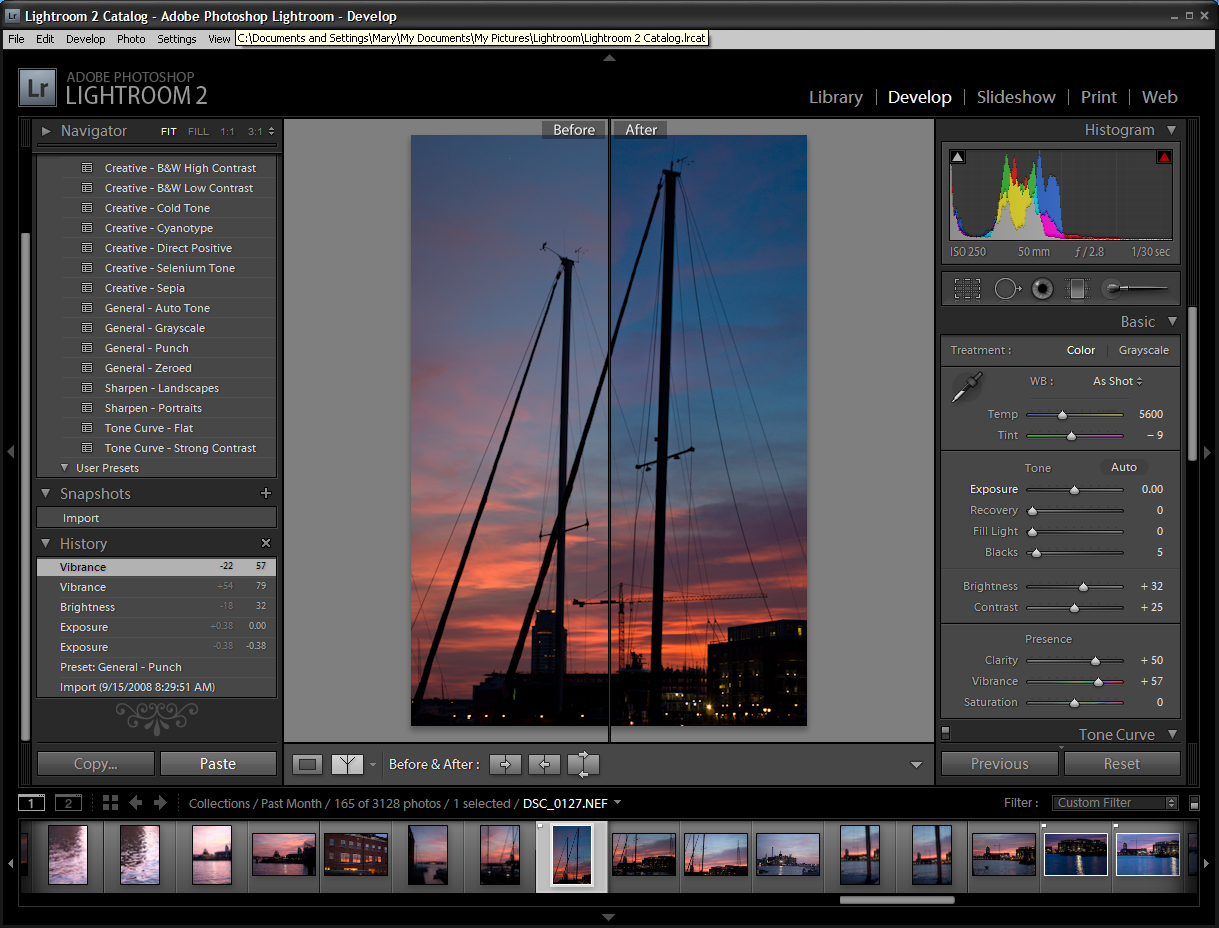
Restoring a RAW after Lightroom import (click to enlarge)
The photography instruction I've had, aside from a black and white film developing class, has all been from the photojournalists that I work with at a major daily newspaper. One in particular took an interest in my work and taught me about proper exposure and anticipating the moment of a great photograph. But because the shooting we do at work is guided by pretty strict ethics rules, I'm also disinclined to do much tinkering with my photos. This tends to be an unpopular opinion in the HDR era, but I like the purity of getting it right in the camera, as well as the more sophisticated understanding of ISO, shutter speed, aperture and focal length that comes from attempting to do good camera work. I'm not opposed to trying out some special effects, but in general, I retouch, crop and maybe add a little punch that my colleagues even wouldn't do.
That said, there are some pretty cool one-click effects that Lightroom provides, as well as any number you can later install. I became particularly fond of Aged Photo, as it adds a nostalgic sensibility to an image; whereas a setting like sepia is cloying. There are also three one-touch black-and-white settings: both high- and low-contrast, as well as the standard grayscale. Speaking of the past, it's clear that Lightroom 2 was created for photographers by photographers due to the inclusion of digitizing old film standards, such as cyanotype and direct positives. It's a nice bridge between those who learned on film, and those who'd like to learn about film.
A fundamental of photo editing is white balance. I shoot with my white balance set to auto, and photos don't always come out quite as balanced as they should (although auto helps you avoid orange images from inside homes and green casts in fluorescent lighting). Finding a true white and a true black are both important and should be done to every photo if there's time, and I loved Lightroom's white balancing options.
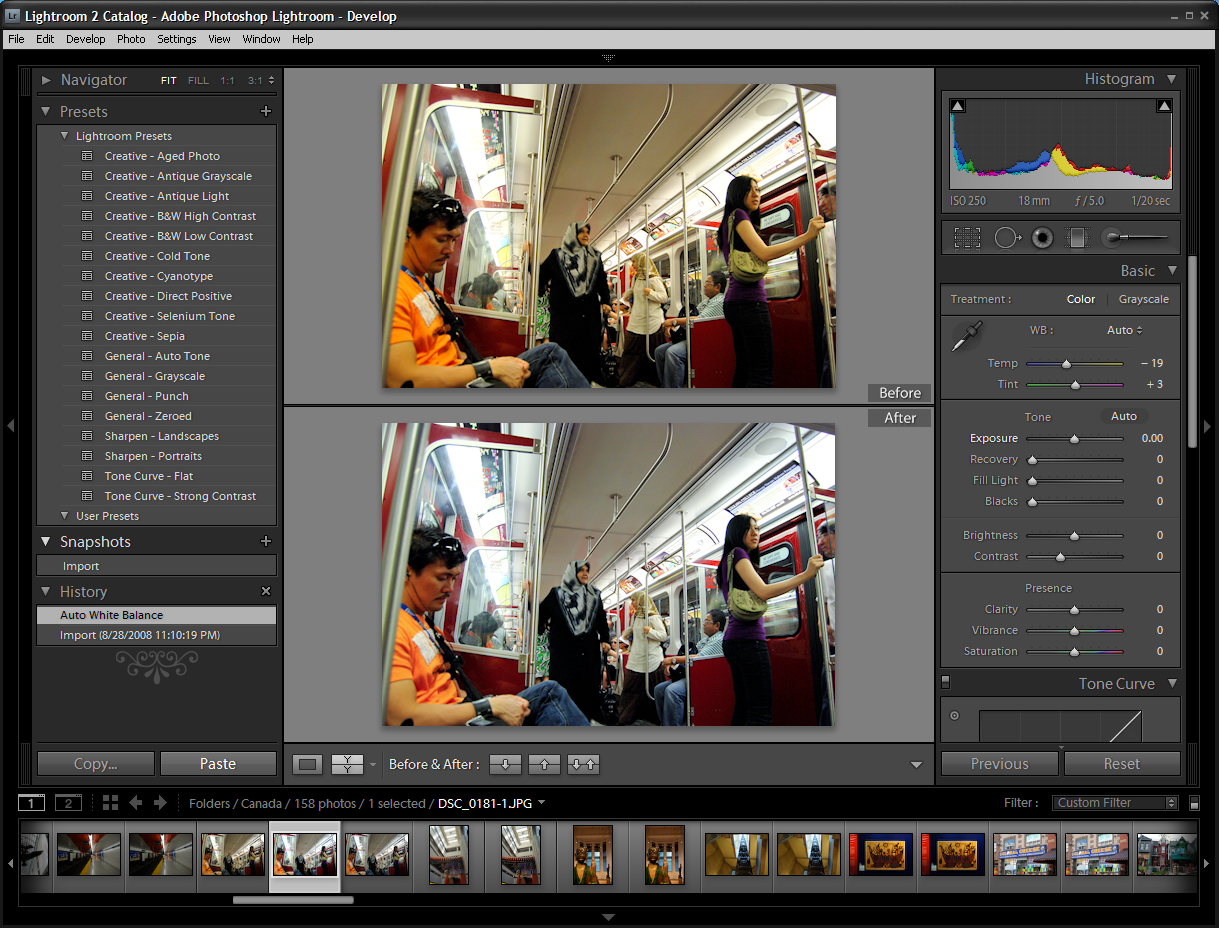
White balance editing (click to enlarge)
The auto one-click step for setting white balance often was more than good enough, but an eyedropper can also be used to find the truest white in the photo and balance the rest of the tones accordingly. I typically did this by turning up the contrast in the Develop module, which makes blacks blacker and whites whiter, as well as setting the brightness and hitting the "Punch" setting, which added vibrancy, clarity and saturation.
Adobe prides itself on what it calls non-destructive editing in Lightroom 2, which means that edits can always be undone and that the original photo file is never altered. For anyone who's ever inadvertently destroyed an image in Photoshop, this is a lifesaver, and it's one of the things I have loved best about Picasa. It does, however, lead to several copies of files -- originals and exported, including some that you may export multiple times with different settings, which means hard drive space disappears quickly.
I did have a few nitpicky issues with Lightroom. First, perhaps because I was using such large RAW files, Lightroom could be slow for me, and also slowed down other programs I was simultaneously running. I often closed Firefox and my instant messaging client while editing, which is not my preference.
I would also quibble with what Adobe believes is a user-friendly interface. While Lightroom is certainly more welcoming to a newcomer than Photoshop, I often found myself Googling for help, even with basics like cropping and exporting multiple photos. Cropping is located in the far upper-right of the Develop module, which you'll see in the screenshots -- it doesn't look like a crop tool; it looks like a grid. Exporting wasn't hidden, but I couldn't figure out how to do multiple photos at once.
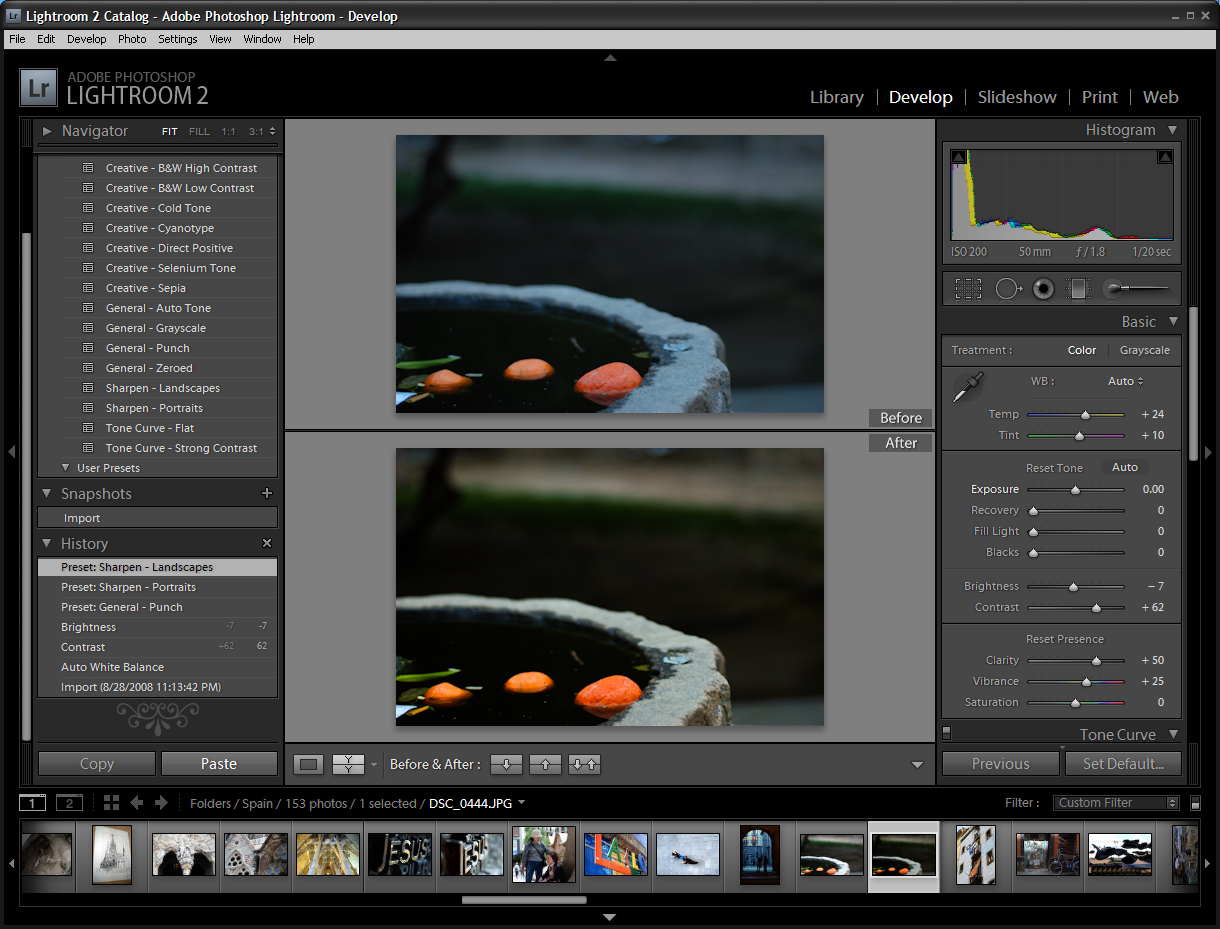
Lightroom 2's Develop Module (click to enlarge)
On the flip side, I can understand how difficult it is to balance robust editing tools with useability, and I can't ding Lightroom 2's creators too hard for that. I found plenty of forums and video tutorials online, which was a big help. Adobe has built a Community Help beta site for exactly this purpose.
There were a few features of Lightroom that I didn't get to take full advantage of, including multiple monitors and what's said to be a good way of tagging a batch of photos upon import with searchable metadata. Because most of my photo collection had already been organized by Picasa and published on my Flickr site, I didn't re-tag previously shot photos. In the month I tested the software, I shot about four different events, and I only tagged the final import with location information. But because I am likely to use Lightroom going forward, searching through tags and location information may make more sense in the future.
Lightroom is targeted at what marketing gurus call prosumers, and its tools are matched well to the needs of these experienced photographers in addition to professionals, without cluttering up the interface with features that aren't likely to be used. A friend of mine who is a budding wedding photographer uses nothing but Lightroom to organize and edit her photos, which seems right in line with what Adobe imagined.
After a month, Lightroom 2 can still feel a bit overwhelming, much in the same way Photoshop is to many users, but that should change over time. I'm on the fence about my workflow going forward and do miss the speed of Picasa, but I've been delighted with some of my photos in the past month and will likely continue to use Lightroom 2 for much of my importing and processing work.
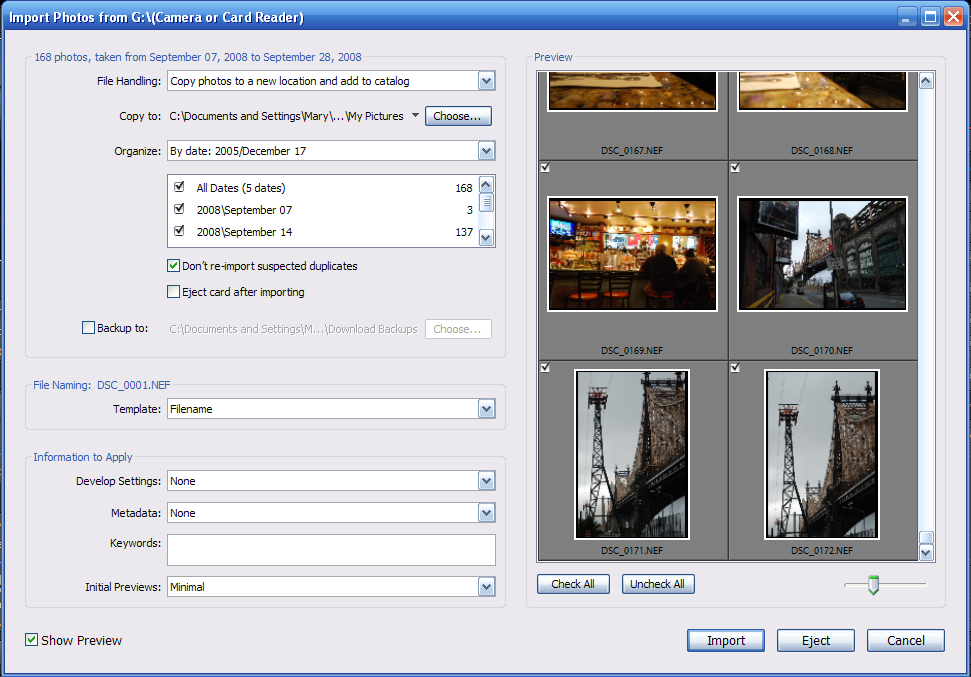
Importing photos from a camera (click to enlarge)
Mary Hartney is Multimedia Editor for the Baltimore Sun.